
A DIY Guide to Installing Fiber Cement Siding
Are you thinking about giving your home a fresh new look this year? Then fiber cement siding, also known as cement board siding, is an awesome choice—it’s super durable and can give you that classic wood shingle style without all the upkeep. With a little preparation and some guidance, you can absolutely tackle this fiber cement installation yourself and save a lot of cost. This step by step article will guide you through the key steps, drawing on techniques you’d see from a master like general contractor Tom Silva, and you can follow along with a helpful video for a closer look.

Step 1: Prep Your Wall for Fiber Cement Siding Installation
First things first: prepping your wall. You’ll want to find and mark all the studs so you know exactly where to nail your fiber cement. This is all about making sure everything is secure. Then, you’ll install a Z-channel and flashing. Think of this as your first line of defense against water—it’s crucial for keeping moisture from sneaking behind your new siding. By applying caulk to your corners and push that flashing right into it for a solid seal.
Step 2: Install the First Rows of Cement Board Sliding
Next up is the filler strip. This is a clever trick to create a nice, flared-out look for your first row of shingles while also filling that gap behind the siding. Remember to cut the strip a little shorter than the space to allow for some breathing room and raise it slightly above the flashing. This helps keep everything dry and looking great.
Now for the siding itself! The video features a product that lets you install several “shingles” at once, which is a fantastic time-saver for your fiber cement installation. As you nail your first piece into the studs, use a chalk line to make sure it’s perfectly straight. Here’s a pro tip: when you get to the next rows, make sure none of the siding joints line up. This is a super important step to prevent any water from getting in. You can easily cut the fiber cement siding by scoring and snapping it with a utility knife and a straight edge.
Step 3: Finishing Tricky Spots from your Fiber Cement Installation Wall
Finally, for any tricky spots like under a window, you’ll just use individual pieces of siding. Secure them with stainless steel nails, and you’re good to go!
For a full, detailed walkthrough, be sure to check out the tutorial video here:
The full credit goes to general contractor Tom Silva. You should subscribe to this YouTube channel “This Old House” today to learn more. Our readers will definitely get this guide helpful. Happy building, and with these tips, you’ll be working like a pro! Now you can easily install fiber cement board/sliding your own.

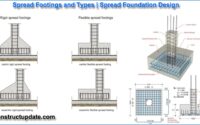
What is Spread Footing | Design of Spread Footings | 8 Types of Spread Foundation | Spread Footing Advantages and Disadvantages

What Is Deep Foundation | Types of Deep Foundation

What is Shotcrete Concrete | What is Gunite Concrete | Shotcrete Vs Gunite
About The Author
John Steffen
I love to share my experience on civil engineering and construction estimates. As a highly capable individual with a strong academic background, I am proud to say that I already possess a comprehensive understanding of the technical elements of civil engineering.