
Floating Slab – Construction Process, Advantages and Disadvantages
Concrete slabs that are lying on the ground as though they are just floating there without any sort of anchoring are known as floating slabs.
As the name suggests, a floating slab looks like a plate that is just placed over water without any sort of attachment. Using floating slabs as a basic foundation for sheds, manufacturing facilities, extra rooms in homes, or garages is its primary purpose. When applied in locations where normal foundations are not necessary, it is cost-effective.
When the construction requires a modest bearing capacity, this kind of slab is utilized. Smaller structures that do not require a deeper structure or extra infrastructure can be supported by this foundation.
Small buildings like manufacturing workshops, sheds, and garages are built on floating slab foundations. Let’s talk about the building procedure.
Why Use Floating Slab?
A sturdy foundation is usually required for building construction in order to support the weight of the entire structure, including the floor, roof, and any additional loads it may have. However, because they are often light in construction, small structures like sheds, garages, and backyard additions do not require complex or exceptionally strong foundations. A floating slab is the perfect option for these kinds of simple foundation systems. Since this kind of slab foundation doesn’t need concrete footing with deep extensions below the frost line, it is primarily utilized in northern regions. Floating slabs, often referred to as raft foundations, are typically built on soil that contains significant amounts of sand, water, or clay.
The weight of the construction is distributed evenly across the base of a floating slab rather than at key supporting columns. Because of their small depth, they are best suited for use in particular construction sites.
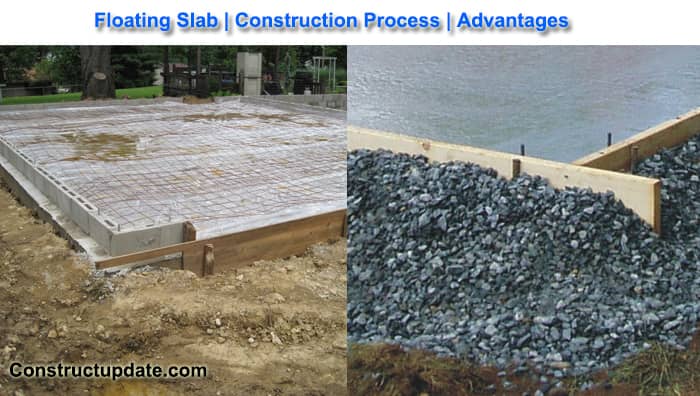
Floating slab construction Process:
- After determining the area for your floating slab, use 3-foot metal pegs to mark the four corners.
- Ascertain the height of the concrete slab’s upper surface. After you’ve determined the height, wrap string around the metal stakes to mark the location. To make sure the height is constant and the string is straight, use a level.
- Mark off the space for drainage by measuring two feet in a lateral direction around the perimeter.
- Measure down in the outer strings two feet and eleven inches. This marks the beginning of the slab’s foundation. Excavate the foundation’s interior in its entirety to this depth. Dig the drainage section down to a depth of two feet.
- To create a drainage space for the foundation, fill the excavated area three inches deep with crushed stone.
- Place two feet of sand on top of the 3 inches of rockfill.
- Using a tamp (sand compactor), compact the sand until it is eight inches below the outer lines. Make sure the entire area is level by checking it in several different places.
- To make the slab molds, place 2 inch by 10 inch lumber around the edge of the intended slab. Join the corners together using joints, then fasten them firmly with frame nails. Verify the forms’ levelness.
- Place support stakes—metal stakes measuring two feet and equipped with nail holes—every foot all the way around the slab form. Additionally, fasten these with framing nails.
- Take down the perimeter string and the original guideposts. Installing any drainage pipes or electrical conduit that needs to pass through the foundation is now necessary.
- Create a 16-by-18-inch trench directly within the slab form to add further support for the walls that will be supported by the slab’s exterior.
- Cover the sand with the 2-inch-thick foam insulation. Additionally, cut pieces to fill up this trench’s base and sides.
- Cover all of the foam with a vapor barrier installation. Pieces should be overlapped by two to four inches, then taped shut.
- Inside the vapor barrier, arrange the three-eighths-inch rebar in a crosshatch pattern. Make sure the rebar is raised off the ground using the 2′′ rebar supports so liquid concrete may flow around it.
- Fill the trench area with the five-eighths-inch rebar. Using the bars, build a cage shape to provide additional support. Pour and mix your cement.
- The quantity of concrete required for the pour will be decided by the cement delivery service if you’re using one. If not, you’ll need to figure out how much to pour by using the numbers on the cement bag.
Advantages of Floating Slab:
- The floating slab construction could be utilized in place of soil treatment where it would be ineffective or have a low capacity to support loads.
- A floating slab can withstand vertical loads or strains that are dispersed across a larger area.
- With floating slabs, trenching or digging can be utilized to pour them, which is less expensive than using footer trenches.
- There is no disruption to the subsurface layer beneath the floating slab, and the quality remains unaffected.
- The sites where the soil layer may change due to high moisture content are perfect for the floating slabs.
Disadvantages of Floating Slabs:
- The subterranean area is not made available for underground access for connection lines facing utilities by the floating slab.
- Its technology is archaic.
- The design resonance of a floating slab foundation is reduced.

Concrete Spalling Causes, Prevention, and Repairing Methods
What are Fine Aggregates – Learn more about Fine Aggregates

What is Shovel and its Types | Parts of Shovel
About The Author
John Steffen
I love to share my experience on civil engineering and construction estimates. As a highly capable individual with a strong academic background, I am proud to say that I already possess a comprehensive understanding of the technical elements of civil engineering.