Sand Quality Test on Site | How to Check Good Quality Sand
Sand is a vital component of any building project. It’s a type of fine aggregate that can be natural or come in the form of crushed stones or crushed gravel sand. It has a finer texture than gravel and a rougher texture than silt.
In the construction industry, sand is a common raw material. It is a fine aggregate with particle sizes ranging from 150 microns to 4.75 mm.
It must be spotless and well-graded (all particles that have the almost same size). Fine aggregates should be long-lasting and free of grit and harmful particles such as dust, kankar, and soft and flaky shale particles. Alkalis and salts should be avoided in fine aggregates.
The weathering of rocks produces sand. According to the availability, different locations employ a range of sands (Pit sand, River sand, Sea Sand) in construction. A well-graded fine aggregate should be used in building (all particles that have almost the same size).
The silt content of the sand should not exceed 8% (particle size less than 150 microns), as determined by a “silt content field test.”
Some field tests are available to assist homeowners in determining the grade of sand (Fine Aggregate) used on the job site. Here are some methods for determining the grade of sand (fine aggregates) on the job site.

Methods of Sand Quality Checking on Site:
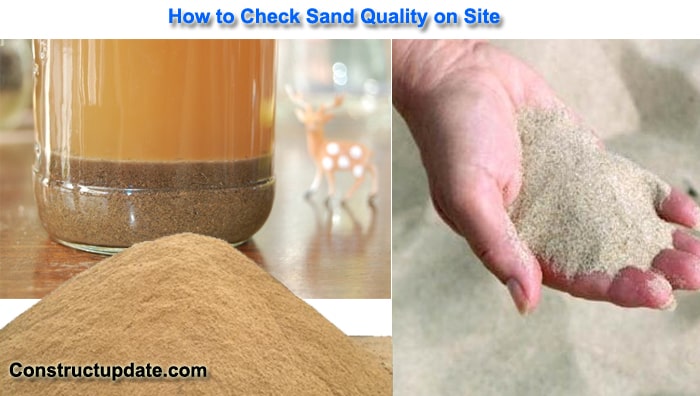
01. Wet palms should be used to rub the sand sample. Sand that is free of clay will not stick to the hand, however, sand that contains clay will stick to the hand and change the colour of the palm. Clay and silt particles are present in this type of sand. You should check the site for “silt content.”
02. Pour a glass of water into a mixing bowl and whisk in some sand. Allow an hour for the mixture to settle before inspecting it. Sand that is free of silt or clay particles will settle quickly, but if it develops a distinct top layer of silt, it contains silt or clay particles. The silt layer’s thickness should not be more than 8% of the sand layer’s thickness. The sand should be cleaned with clear water if it contains more than 8%. Glass should have a consistent diameter throughout its height.
03. Repeat the technique above, but this time add caustic soda (salt) to the glass of water to identify organic contaminants in the sand. If the water turns brown, there are likely some organic contaminants present. This type of sand should never be utilised.
04. Take a pinch of sand and taste it; if it tastes salty, salt is present in the sand, and it should not be used in any construction. Such sand is naturally found in rivers, however it is either sea sand or sand from a river section that is frequently subjected to tidal waves near the sea.
05. Visualization is used to determine the particle size and sharpness of sand (fine aggregates). Organic contaminants (such as shell, shingle, and other pollutants) should be absent from the sand, or they should be contained within visual limitations.
06. The preceding are essentially field testing. Certain laboratory tests, such as Fineness Modulus and Silt Content by Weight, must also be completed before it can be approved. For major projects, such laboratory testing are recommended.


